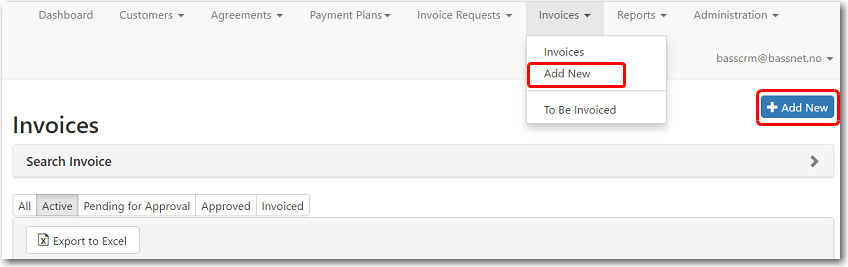
To create a new Invoice:
1. Go to the Invoices tab and click Add New.
Alternatively, you can click Add New from the Invoices listing page.
2. The Add a new Invoice screen is displayed. Here, you may insert all the relevant details for the invoice request.
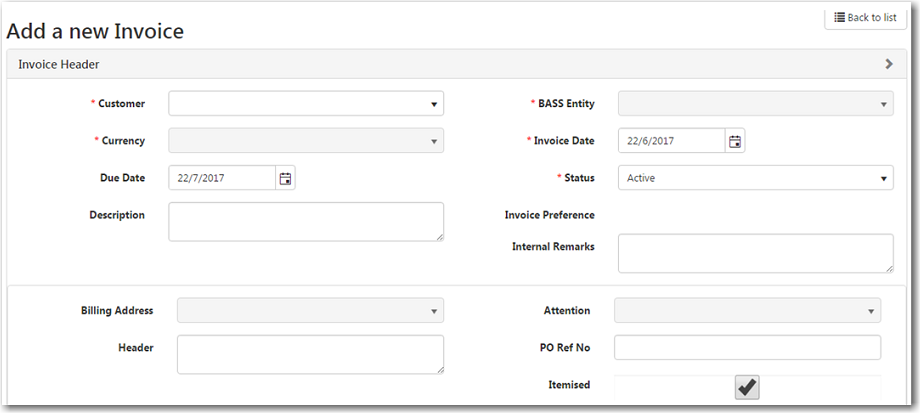
The following table provides you with more information on the available fields:
Field |
Description |
| Customer | Select the customer to whom the invoice will be issued. |
| BASS Entity | Select which BASS company is issuing this invoice. For example, BASS AS, BASS CY, etc |
| Currency | Select the currency used in this invoice. |
| Invoice Date | Select the date this invoice is created. |
Due Date |
Select the date this invoice is due. |
| Status | Select the status of the invoice, i.e. Active, Pending for Approval, Approved, Invoiced. |
| Description | Enter a description regarding this invoice. This will not appear in the invoice. |
| Invoice Preference | This field is automatically populated from the Invoice Preference field in the customer's details. You can change this by Editing a Customer's Details. |
| Internal Remark | Enter any remarks regarding this invoice. The remarks will not appear in the invoice. |
Billing Address |
Enter the billing address of the customer. |
| Attention | Select
from the list of the customer's contacts someone to receive
the billing information.
Only contacts with the Billing Contact check box selected will be displayed. |
| Header | Enter
a table header for the invoice.
The text will be displayed directly above the items table in the invoice. |
| PO Ref No | Enter the Purchase Order reference number, if any. |
| Itemised | Select this check box to display the list of purchased items in the invoice. |
3. After you have entered all the necessary information, click Save. The System will record the Created By and Last Revised By dates.
4. A new section will be available below for you to select an invoice Recipient from the list of contacts (with the Invoice Recipient check box selected).

The other fields in this section will be automatically populated by the System.
Field |
Description |
| Sent Date | The date the invoice was sent to the customer. |
| Approved By | The person who approved the invoice. |
| Approved Date | The date the invoice was approved. |
| Export Date | The date the invoice data was sent to BASSnetTM Financials. |
5. Under the Items tab below, click Add to be Invoiced Items to add approved items from an invoice request.
Alternatively, click Add new record to add a blank item row which you can manually define.
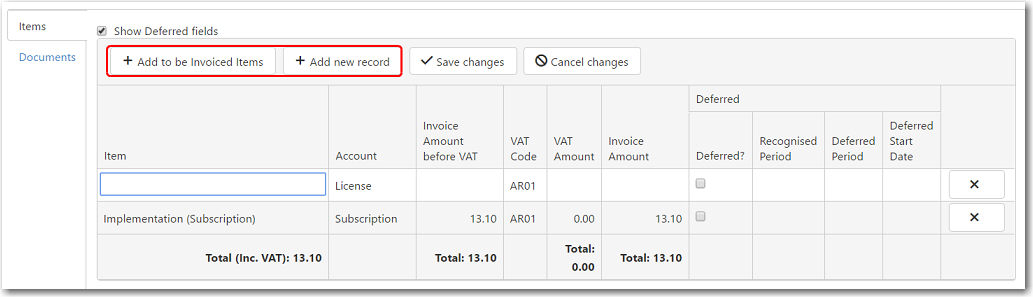
If you clicked Add to be Invoiced Items, the fields will automatically be filled based on the details in the invoice request.
The following table provides you with more information on the available fields:
Field |
Description |
| Item | If you clicked Add new record, type the item or service to be invoiced. |
| Account | Select the account this item falls under. For example, software development, training, maintenance etc. |
| Invoice Amount before VAT | Enter the invoice amount before VAT is applied. |
| VAT Code | Select the VAT code from the
list in the Register.
The default VAT code displayed can be changed in the Company Register. |
| VAT Amount | This column will be auto-generated based on the Invoice Amount before VAT and VAT Code. |
| Invoice Amount | This column will be auto-generated based on the Invoice Amount before VAT and VAT Amount. |
| Deferred? | Select this check box if the
item's payment is deferred.
This only applies to maintenance and subscription fees. |
| Recognised Period | Enter the number of months in
which the payment is recognised at the time the invoice
is issued.
For example, if the System went live in March, and the invoice is created in June, the recognised period is 3 months (April–June). |
| Deferred Period | Enter the number of remaining
months in which the payment will be deferred.
For example, if the invoice is created in June, and the payment will be deferred until next year, the deferred period is 6 months (July–Dec). |
| Deferred Start Date | Select the start date of the
Deferred Period.
For example, if the invoice is created in June, and the payment will be deferred until next year, the deferred start date is 1st July. |
6. As you make changes, a red arrow will appear at the top left of the field indicating that there are changes that have not been saved. Click Save changes to confirm.
7. To attach documents related to this invoice, open the Documents tab and click Select Files.
8. Finally, click Save to complete the invoice.