To set up leave parameters:
1. From the Leave Management menu, click Leave Setup. The Leave Scheme screen will be displayed.
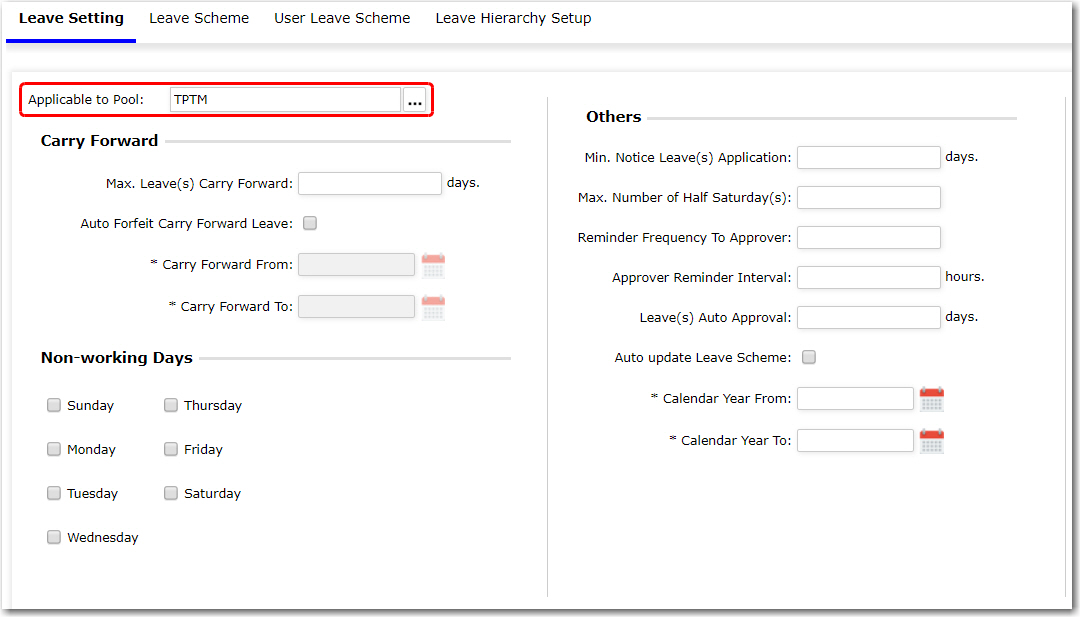
2. Click the Leave Setting tab. This is where you will specify the settings that will be applicable for each Office. From the Applicable To field, select the Office for which this scheme is to apply.

Field |
Description |
Leave(s) carry forward from previous year |
The number of leave days that can be carried forward to the subsequent year. |
Min. Notice before applying leave(s) |
The minimum number of days prior to the actual leave date that the leave application should be submitted. |
Max. number of half Saturday |
Indicate the number of half-day leaves that can be applied on a Saturday for the month. |
Reminder frequency to Approver |
Indicate the number of times an email reminder should be sent to Approver if he/she has yet to approve the leave. |
Reminder Interval |
Indicate the interval between each email reminder. |
Auto approve |
Indicate the number of days after a request is submitted that it will be automatically approved if there is no action carried out by the Approver. |
Auto Update Leave Scheme |
Select this check box if the leave scheme for an employee is to be automatically updated once he reaches a new leave bracket or if he is promoted and so on. |
Auto Forfeit Carried Forward Leave |
Select this check box if you want the leave days carried forward to be automatically forfeited after the due date passes i.e. the 'Carry Forward To' date. |
Carry Forward From |
This is a mandatory field if 'Auto Forfeit Carried Forward Leave' is selected. Indicate the date range of the validity of the leave days that are carried forward. |
Carry Forward To |
This is a mandatory field if 'Auto Forfeit Carry Forward Leave' is selected. Indicate the date range of the validity of the leaves that are carried forward. |
Calendar year from |
The Calendar Year From & To fields are used to indicate the leave entitlement year. Once the date reaches the 'Calendar Year To' date, the system will automatically add the next year's leave entitlement to the employee's leave balance. |
Calendar year To |
The Calendar Year From & To fields are used to indicate the leave entitlement year. Once the date reaches the 'Calendar Year To' date, the system will automatically add the next year's leave entitlement to the employee's leave balance. |
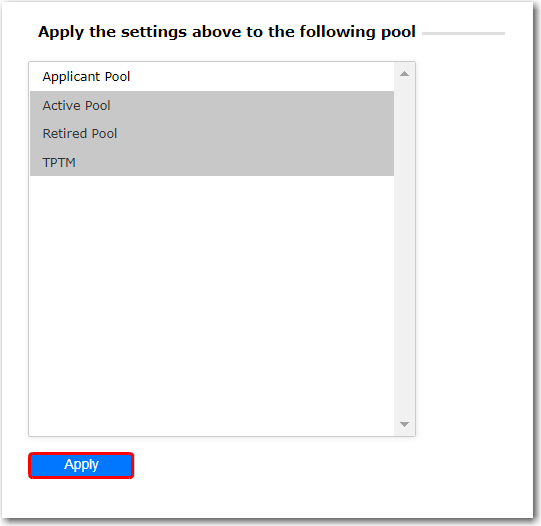
3. Select a pool from the list of Apply the settings above to the following pool, and then click Apply.

Note: You can select multiple pools using the 'Ctrl + Click' function.
Note: The Apply button will be disabled unless a pool has been selected in the pool listing.
4. Click Save.